This once referred to a sail boat, a 23ft BayCruiser built by Swallow yachts. She's now with a new owner, so this blog now follows the fortunes of another Riff Raff – me!
You’ve all given up on me – not a word since August and now a non pc seasonal greeting. Yes, I’ve been idle on the boating front.
Lockdown has been “winterised” – her sail is off a in a bg in my garage. All loose ropes have been taken home and washed in the washing machine *** and the centre board sent on a slimming course.
You may have read that, despite having had all the anit foul taken off it, it still stug resolutely at about half down. So I attacked it with a plane and took off all the paint and filler and one laminate of the top layer of ply wood. This made it about 2mm thinner, |(after repainting) so it had better now fit. I wait a break in the gloomy cold weather to find out.
In the meantime, I’ve not been idle – I’ve actually been reading lots of books as research for my PhD. Most were relevant and I have now passed my “upgrade”, meaning I’m an official Research Student, not just condemned to Master of Philosophy status…..
Cheers for the New Year (well the one celebrated by ancient white men and therefore not to be mentioned in woke circles……
My few readers might have been worrying about Lockdown as there haven’t been any posts since May. Has the builder sunk her? Rest assured – she’s still in a sea worthy condition.
The last few weeks have been spent fixing snags. The centre board stuck down. Then it stuck up, so it was manhandeled out of the casing, taken home and sanded to make it thinner. When I refitted it a couple of weeks ago, it still stuck, so it was taken out again, transported home and vicisously sanded. All that expensiveCopper Coat that I had lavishly spread on both side of it was ruthlessly removed. I can’t make the thing any thinner with sanding off the woven glass fibre mat……
Fortunately, when fitted yesterday, the centreboard now behaves and slides up and down with comparative ease. But, I noticed it didn’t shift when we ran aground on our extended sea trial yesterday – fortunately, it was on a rising tide.
Then there were the leaks from the centre board case – not so much leaks as sloshing. First there was the leak from the rear of the case, out from the base of the cover. This leaked strtaight in to the blige sump, so provided that I kept the bilge drains open, the “excess water” went straight back into Chichester Harbour. This was fine under sail, but as soon as Lockdown became a motor boat, the stern dug down, lowering the bilge tank so the top was below the water line………
Then there was the slop from the front of the case. A rib, driven by a caring skipper, had cut across our bows at high speed. Lockdown thumped into the wash and most of it seemed to slop through the centreboard casing. Once Loackdown was back on her trailer, I measured the width and length of the slot.
The snag is that I now have to work in the integral garage of our house, giving rise to a certain amount of distress from the Owners Agent. Also I have to work some 80 miles from where Lockdown rests on the trailer, which causes me some angst too. However, over the course of the next couple of weeks I made a seal for the back of the Centerboad case, a box to sit on the stern of the case in which I could fix the controller for the motor and a wooden strip to seal the front of the centreboard case. Having swept up the wood shavings, I took all the bits to Northney and fitted them to Lockdown. To say that the slop is fully cured would be an overstatement but there has been a significant improvement.
Now I can start learning how to sail her. And that’s when we ran aground…….
After a few weeks of pretty awful weather (I’ve added “Don’t sail in the rain” to the rules of sailing that I developed when taking Vagabond round Britain) , the sun shone this week and the winds were light, even warm from the South. Just my sort of sailing weather these days. It was time to be brave and wet Lockdowns’ keel. (This sounds a but like one of Odyseous’s voyages but I didn’t have an oar to carry down to the sea1). In the few weeks between taking her to Northney to last week I’d braved the M25 (quite tame in lockdown) and painted her name on the bows, 2 worked out how to make the throttle control on the motor talk to the motor without using wires and built a control console to house it and the ipad nav system over the centre board case.
So, Thursday of last week was the moment of truth. I remembered how to rig the mast and the sail, I’d found where I had left the main sheet, mopped up the water in the cockpit 3 and we were ready to go. Only two other boats in the queue to launch and it was an hour before high water. Perfect.
She slid down the slipway. Ooops. I hadn’t got out the mooring warps, so there was a little panic whilst I found them. Nor had I fitted any thing to tie on my non existant fenders. Fortunately, there was little wind and no wave action and the gunnel was at the same level as the top of the pontoon so I felt I could leave her for a bit whilst I “lost” the car and trailer.
A few minutes later, lifejacket in place, I was back on board. I lowered the motor into the water and checked operation. Tick 1 on the checklist.
The rudder went down to and locked in place. Tick 2 on the checklits.
I know it was only a F1 or 2 wind, but I’m a mimp so I opened the sea cocks to let in the water ballast. She slumped a couple of inches into the water. Tick 3 on the checklist
I lowered the centre board. It stuck half down4. I peered down the slot. There, glinting at me in the water, stick fast between the board and the side of the slot, was a 5 mm long loose screw. Dropped, no doubt, by some careless dockyard labour. If I could get to it, I could “flick” it out of the way but was just beyond the reach of my screwdriver. Fortunately there were some shipwrights having their well earned lunch just up on the hard. One lent me his long screwdriver and it did the trick. The centreboard went down a relucant few inches and stuck fast again, moving neither up nor down.
I decided to go sailing none the less. If the worst came to the worst, I could bring her alongside the slip and let the weight of the boat and the receeding tide push the centrebaord up into the slot when I’d finished for the day.
A quick radio check on Channel 80 – the Marina staff even wished my luck on the maiden voyage – and off we went. Pottering noiselessly out through the marina entrance. A quick turn into the wind and up went the sail.
Motor off and up. She fell off the wind to port, so that’s the way we went – off towards the sea. I spent a couple of hours playing with her. The helm is light and neutral. When the helm is let go and the sheet released she drifts sideways down wind. On a reach she picks up speed very quickly and I wonder if she’s plane without the ballast on board. She points to within 50 degrees of the wind and tacks quite quickly through it. She has a docile gybe (admittedly in the light air). I had noticed that the lacing of the sail to the yard is not quite right and realised that I need lessons in how to trim a lug sail.
It was a relaxing couple of hours, pottering about in the upper reaches of Chichester harbour. We were overtaken by a Swallow BC 23, who took a lovely picture of us – its’ shown below and I hope Paul will forgive me for stealing it from his post on the Swallow Yacht Facebook pages.
First sighting of Lockdown
I hope there will be many more over the next few months!
Notes
This is a nod to my classical education for (as I remember it) Odysseus threw his oar over his shoulder and marched home when he’d given up roving.
A sllight exageration – I’d used the usual transfers – a bit like Letraset (rememeber that?)
No, it’s not that she leaks. It’s just that the second hand “tarp” is not quite long enough.
Or should it be half up – does this denote I’m an optimist or a pessimist – or does that just apply to the fullness (or otherwise) of glasses?
I’m sorry that there’s a bit of a gap………Allotments, research and all sort of other stuff has got in the way. Also, I’ve been evicted from the cowshed – the farmer has reaslised that he can refurbish the site and earn much more rent from real businesses.
So, there was a frantic week or so to take delivery of the pod and to install it in the boat.
And here it is, lowered and ready to power up!
Then I rushed to Gwbert and enlisted the designer for some consultancy about the sale plan The mast, boom and spar were ready, the sail had arrived from somewhere, so she was ready to rig.
The new stainless steel rudder stock appeared and was coupled to the rudder blade. Piecs of suitable rope were found from stock and we now had the means to raise and lower both the rudder and the motor. We moved on to the centreboard. It was resoloutely stuck “up”. We’d worry about that later.
By the afternoon, we were able to raise both mast and sail for the first time:
But it was too late to take to the water – the spring tide had receeded, leaving acres of sand – we’d have to wait until the morning. So we floated her in the “test tank” adjacent to the workshop. After half an hour she still seemed to be dry inboard. I attempted to couple the “remote” controller for the motor to the motor using bluetooth. This was a complete failure, so I had to rapidly work out how to use the wired connection, where to route the wire and where to locate the controller in this new configuration. This involved a trip to the local Screwfix for some plastic conduit. I hoped that this was a temporary arrangement and put in a call to the supplier of the Epropulsion pod to see if he had the answer to my technical problem. He had, but it was not re-assuring: “I think that feature has been discontinued” I was told……..
The following morning we still left it a little late, by the time we were organised and the winters collection of driftwood had been cleared from the slip, high water had come and gone. We didn’t have much time.
Down the slip and off the trailer she slid. We forced the centre board down a little and I did a quick trip under power – it all seemed to work. The breeze was light and dropping, the tide was dropping quickly. We had about five minutes of light airs sailing, two minutes of running agroud and then dragged her back on the trailer before the sea disappeared for another 8 hours or so. So here she is, under sail, with the designer in control.
And here’s picture of me running her aground:
Then it was onto the trailer and off to Northeny (Hayling Island) trailer park, where she awaits an anchor, some oars and a clean before the real trial begin! I see she’s been discovered there by one of my readers!
Dear Reader (s). It’s been three months since I put finger to keyboard for this blog that you might have been wondering what had happened. Well, I’m still here, having survived my first Covid Jab (AZ), some cold weather, an essay, a little work on the boat and an eviction notice.
I brought her back from the painters in late December and stuffed her back in the shed. She looked really pretty in her coat of blue with white underside, although a little dirty from the trip up the motorway.
I didn’t do much to her in January, as I had an essay to research and write. Post grad research is a bit difficult when all the libraries and record sources are closed – but hey ho – there’s a load of stuff available on line and I even bought a couple of books on ebay, or was it Amazon? I forget. By the end of January 10,00 words or so had been written about the state of the glass manufacturing industry in England in 1760 and I was able wrench my self back to the present day. I’d even been given a delivery date for the arrival of the Epropulsion pod – second or third week of March. That’s when there would need to be some serious inventing to do. But the bathroom shower decided to leak and that needed refurbishing – I could only remove the mixer valve by cutting an access hole through the wall (fortunately a stud work and plasterboard job) and then the mixer valve “repair kit” (a complete new mixer valve) took a week to arrive and the boss white I had for the olive joints was so old it had gone solid. At last I could spend some time on the boat.
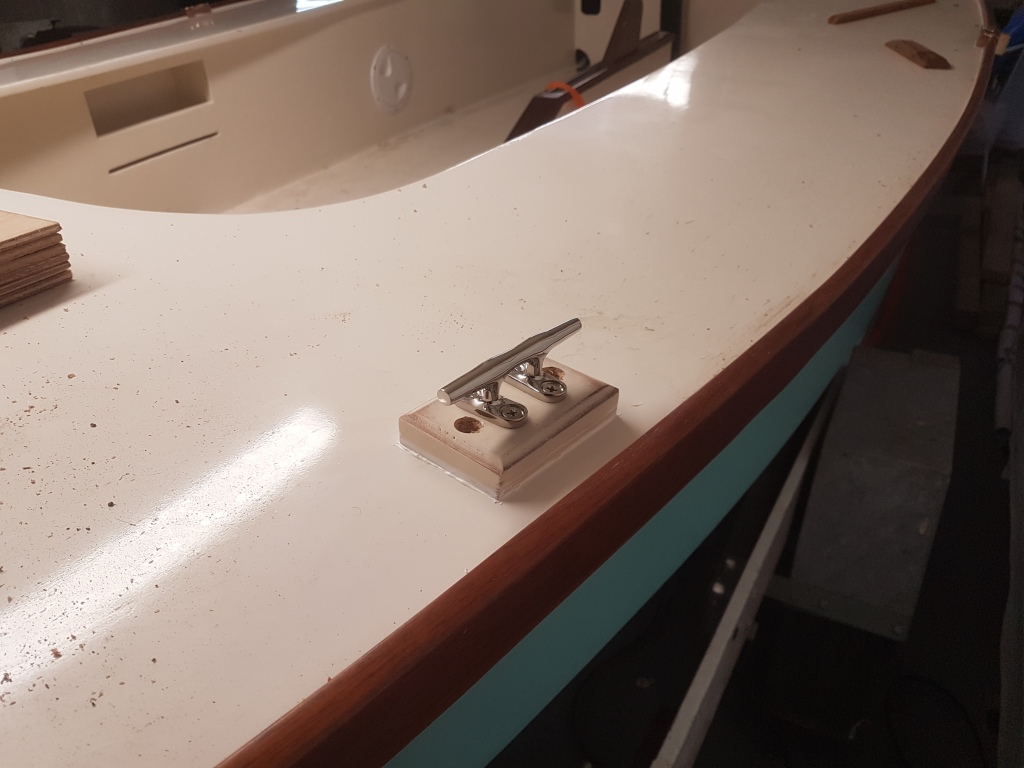
During February I did some really big projects – I made a handle for the forehatch, fitted a cleat to each quarter and bent some strips of brass and cut a length of dowel that would hold the mast in place. And I fitted some cool breather pipes to the ballast tanks and worked out how to retain the grating over the bilge sump. The centre board was fitted in the centre board case and it’s pivot bolt pushed into place. The board is quite a tight fit in the case and need quite a pull to get up (and down!). There’ll be some more inventing required there to devise how to secure the lifting rope.
Then came the bombshell. The farmer/builder has realised that there’s a real shortage of workshop space in the locality and, if he redeveloped the site, with proper shops, he probably didn’t need to farm any more. So I’ve been given my marching orders and have to be out by the middle of April. So I’ve made an appointment with the boat yard to take her to Wales on the 14th April, to fit the mast and sails.
It was time to give some serious thought to the way the pod drive was to fit. I had found a drawing of the unit on the suppliers web site and could now work out how big a holes I was going to have to cut in the hull of my lovely new boat….and marked it out with a felt tip pen. Not totally trusting the drawing, I thought I’d wait until the unit arrived before attacking the floor. I thought I’d just try out the slide arrangement that I’d carefully made up using jib car slides and tracking. The motor mounting platform moved smoothly up and down – but it was unloaded. I thought I’d better try it out with a simulated load – disaster. The whole thing juddered and stuck and was clearly not going to work, so it was back to the drawing board.
Fortunately, I had some 8 mm diameter thick walled stainless steel tube “in stock” and, coincidently, a length of Delrin which had an 8 mm bore (who doesn’t have these materials to hand, I ask myself). The steel slid smoothly through the Delrin, so a new design emerged. Two steel tubes would be mounted in the hull, one either side of the slot through which the motor would emerge from it’s housing. A new motor platform would be made, and pieces of Delrin tube would be embedded in it with epoxy. Some sort of bridge would be made across the top of the motor well to secure the top of the steel tubes. It would also provide a place to mount a lifting mechanism. Positive bottom stops would have to be place so that the platform was solidly fixed when under power and some sort of thrust block would be needed, against which the platform would push the boat along, to reduce the bending strain on the steel tubes. Building commenced, using hardwood blocks to hold the steel tubes in place. Top and bottom blocks were made together and fixed in a jig. The motor mounting plate was made out of layers of 6 mm ply epoxied together – the Delrin bearing tubes were cut to length and had “flats” cut into the outer section so that the epoxy securing them in place had a positive mechanical lock. It all seem to work. All we need now it the motor.
It’s a catchy title. But what’s blue? It’s the boat, silly. I’ve been sent a photo (taken secretly in the paintshop) of work in progress (Lockdown Tier 4 permitting).
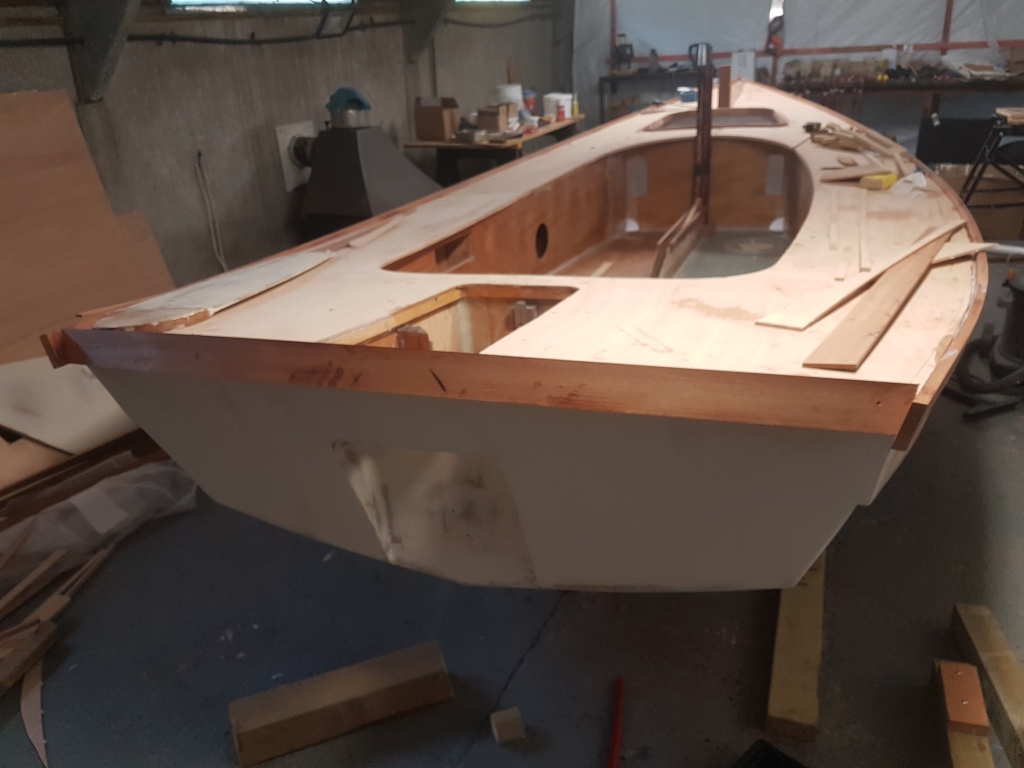
Here’s the current situation:
She’s not finished yet – but looks rather pretty already (or so the owners agent thinks)
It’s amazing how a professional can turn an amateurs work into something that looks FABULOUS.
It’s a month since I’ve blogged (or whatever the term is). My regular reader must be wondering if I have succumbed to the virus (which one do they ask?) None, I say but the one of mild laziness. I’ve actually been quite busy but doing other things, one of which being pretending to do some research for my PhD. I’ve actually been to the British library, for the first time for almost a year. I’ve been on London Underground. It’s almost civilised, as you can see from this photo, taken on the Circle line at Kings Cross at 3:30 on a Thursday! Social distancing was NOT a problem.
(I suspect everyon was crowded together in Regent Street)
But enough of this social comment, let’s get back to boatbuilding. The more assiduous of my readers will remember that I had a blog post some time ago about lockers and realised that my approach towards making them in some specially selected spaces in the forward end of the cockpit was totally wrong. They wouldn’t have been watertight and would have flooded in the event of a capsize which meant that would I be unable right the boat and she’d probably sink. Which wouldn’t do it all.
I had then bought some rectangular hatch plates which turned out to be too big. So I gave up the whole idea and sealed the hollow spaces when I put the deck on.
In the meantime, I found some circular hatch plates that were about the right size and had ordered two of them. They finally arrived but I realised they needed entirely flat deck to sit on to keep them watertight. The area I had chosen to install them was curved in at least one, if not two, directions. I needed some way of getting a thin flat ring glued to the deck on each side of the cockpit over the space where each locker could be. I retired to my bath for some thinking space.
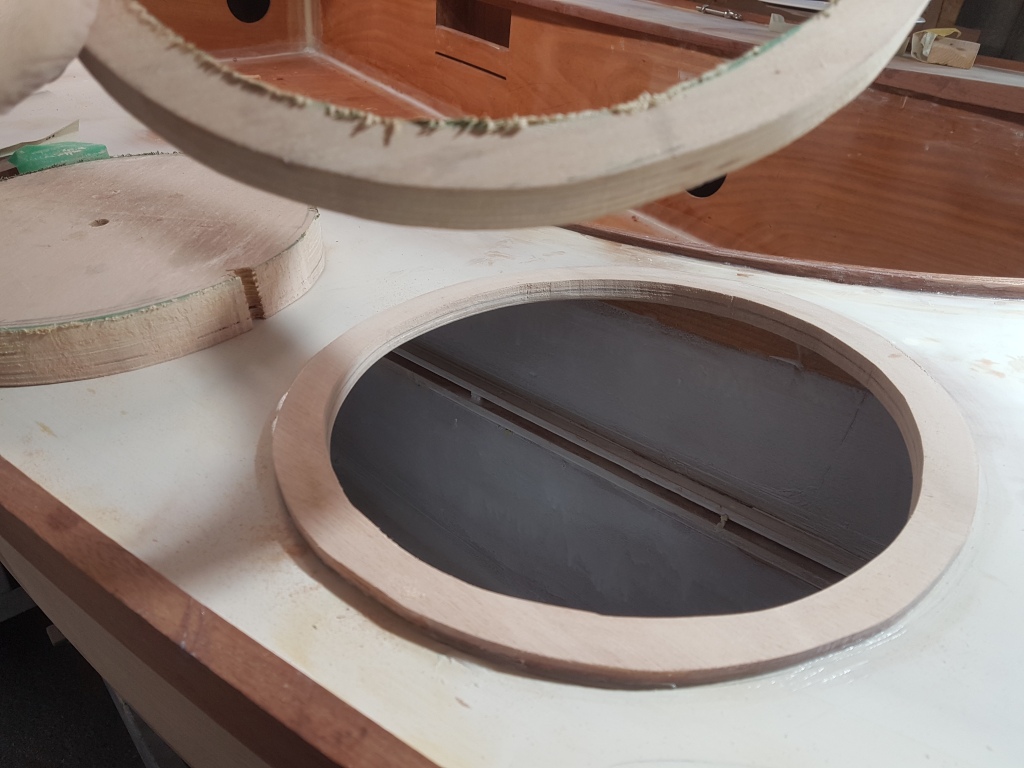
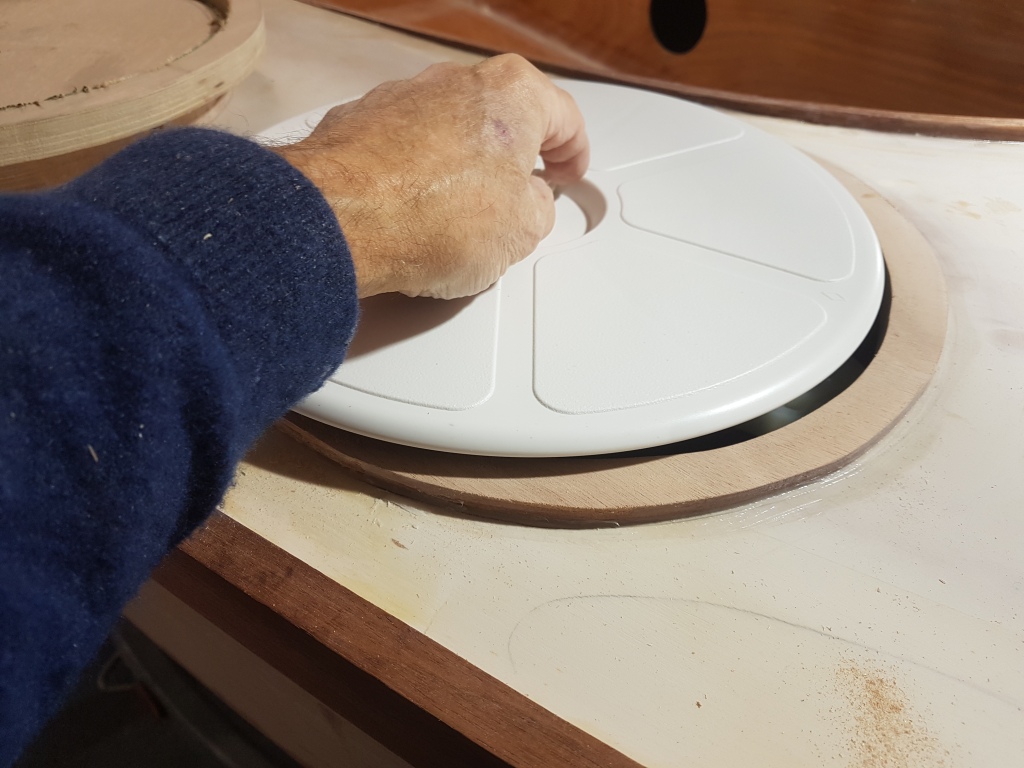
This proved unsuccessful but the following morning I had the solution. The hatch plates are circular and fit over a circular hole in the deck. The watertight joint between the hatchplate and the deck is formed by a an annular rubber seal stuck to the underside of the hatch plate just inside its outer edge. I needed to glue an annular mating face onto the deck. Here was the plan: if I cut a thin disc to the diameter of the deckplate and a thick disc th same size, I could use the thick disc to keep the thin one flat whilst it was expoxied to the deck. Then I could cut a circle through the two pieces of ply and the deck and lift out the piece in the middle. Provided that the glue holding the two discs together was not covering the outer ring of the disks, I could then lift off the outer ring of the thick piece and there was the mating face glued to the deck. Her’s how it looked:
The two discs lued to the deck, the hole cut through the discs and the deck
The outer ring of the thick bit lifting away. Success!And here’s the hatch!
So now we had hatches. But the cockpit rim looked untidy – it was all raw edges of ply wood.1 Something had to be done.
So I cut some thin pieces of Utilie and started epoxying them to the edges. They had to be very thin so that they could be laminated around the corners of the cockpit it was a fiddly and messy job, requiring many spring clips and cross cockpit supports.
In the end the effect was quite pleasing
And that, as they say, was the end of the glueing for a bit. It was time to get her painted. I’d arranged with the boatyard that they would do a professional job on her on the basis that it would cover up all the defects in my workmanship! The only trouble was that the boatyard was in Wales and England was locked down because of the virus.
The first thing to do was to get the boat and the trailer out of the shed and that took most of the day. I had to find some more pallets to build a better roadway immediately outside the door and then the ensemble was pushed gingerly outside and turned round so that Martina (the car) could be back down towards the towing hitch. Oh dear, I nearly forgot to strap the boat to the trailer! And then I had to find the lightbar and test it. I towed the trailer and the boat down the barn near the road and left them there for the night.
The following morning we were off. It was a misty start. Martina ) and I towed her across (or rather round) the Cotswolds, roughly following the line of the Ridgeway, along an almost empty M4 (well it was still lockdown in England) to cross the Severn at Bristol into Wales, where it started to rain in torrents. Along the South Coast of the Principality, past Port Talbot and then up to Cardigan. It was foggy, damp and cold when I arrived at the Boat Yard and left her in their care. I assume she’s still there in their new paint shop……..I hope they’ve started painting her.
In the new pint shop
That’s it for the time being – more to follow next year – I hope.
Notes
The observant ready will notice a certain amount of artistic licence in this blog. It’s all to do with the relative nature of time and whether a writer is obliged to record everything in strict chronological order.
As I write this it’s the beginning of November. We had our first frost of winter this morning after what seems like weeks of rain. But I must get on, I’m meant to be taking the boat to Wales to be painted in the middle of this month. Whether I can or not depends upon the new lockdown. Can I classify the trip as work? If so we can go. If not we can’t. It’s a moral question for the moral maze that we all now inhabit.
Anyway, putting that to one side of the moment (as the salesman are taught to say), I had better report on progress. The chimney has been cleaned and the stove works. A new chain on the chainsaw makes light work of cutting up pallets to feed the stove.
Most of the cattle have been sold, so I no longer hear them attacking the water trough behind the shed or noisily chewing the cud as they moodily observed progress. Charms of Goldfinches gathered in the woods as the leaves and rain fell in torrents.
The farmer tells me he is looking for more shed space. Would be customers of his appear at my door telling me that I’ll soon be finished. I tell them that you never finish building a boat and I’m keeping my retreat. I’ve no intention of moving out. I’m feeling frosty towards them all and battening down the hatches.
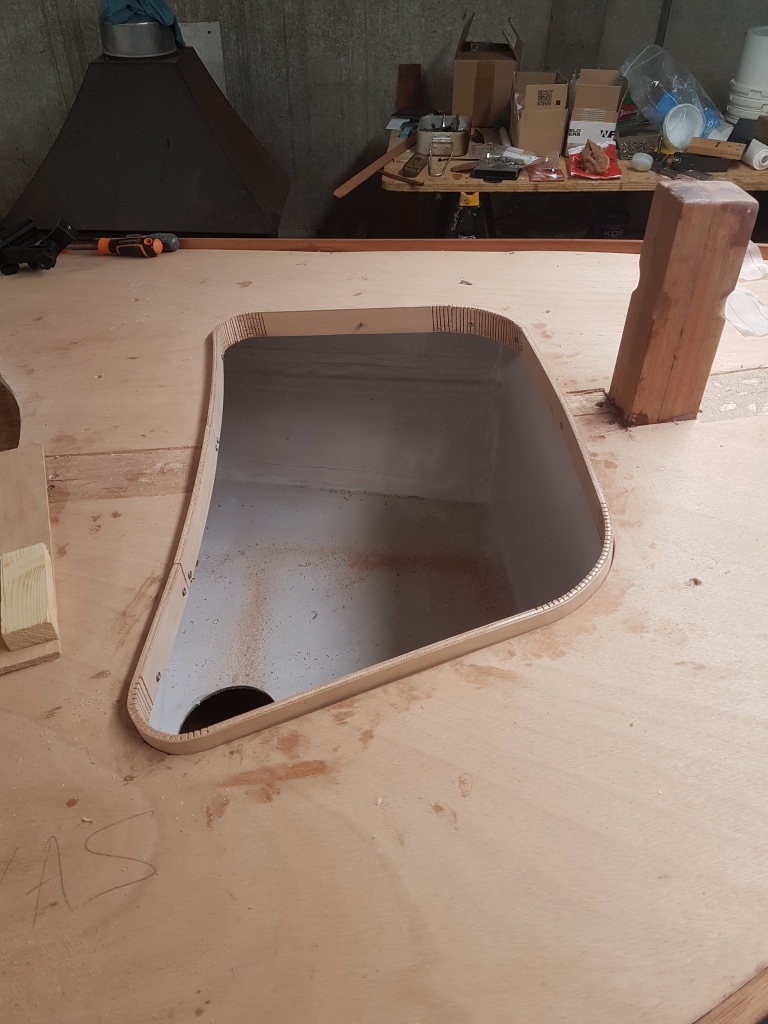
Speaking of which, back to the boat. I had been pondering the hole (sorry, the hatchway) in the foredeck. Was I really meant to go sailing with that wide open? Despite the buoyancy tanks I imagined the boat diving like a submarine when in a head sea. I had already glued a raised lip around the hole but decided that wouldn’t be adequate.
“It’ll need a cover to fit over the top (and round the lip)”, I thought. “ But, the hole is a ’designer’ hole, not a simple rectangle but with a curved side and corners. To help matters, the deck it sits in is curved – or cambered as the yacht designers say. It’s not going to be easy.”
This all posed a challenge. The hatch had to conform with the camber of the deck. More inventing required. I decided to make it out of a double layer of plywood. The bottom one would be a match to the plan of the outside of the lip, the other somewhat larger. The mating faces would be coated with epoxy, there then clamped to the deck whilst the epoxy set. The sides would be strips of plywood epoxied to the sides of the bottom layer of the cover. Three were easy for they were straight; the fourth was curved and would need some sort of former to hold it in place whilst the epoxy “went off”. Then there were the rounded corners to consider.
I thought I’d leave that for another day or to and set to “make it so” (as Captain Kirk would have said)……Two days later the epoxy had set and the “trial fit” of the cover showed that, so far, it was OK.
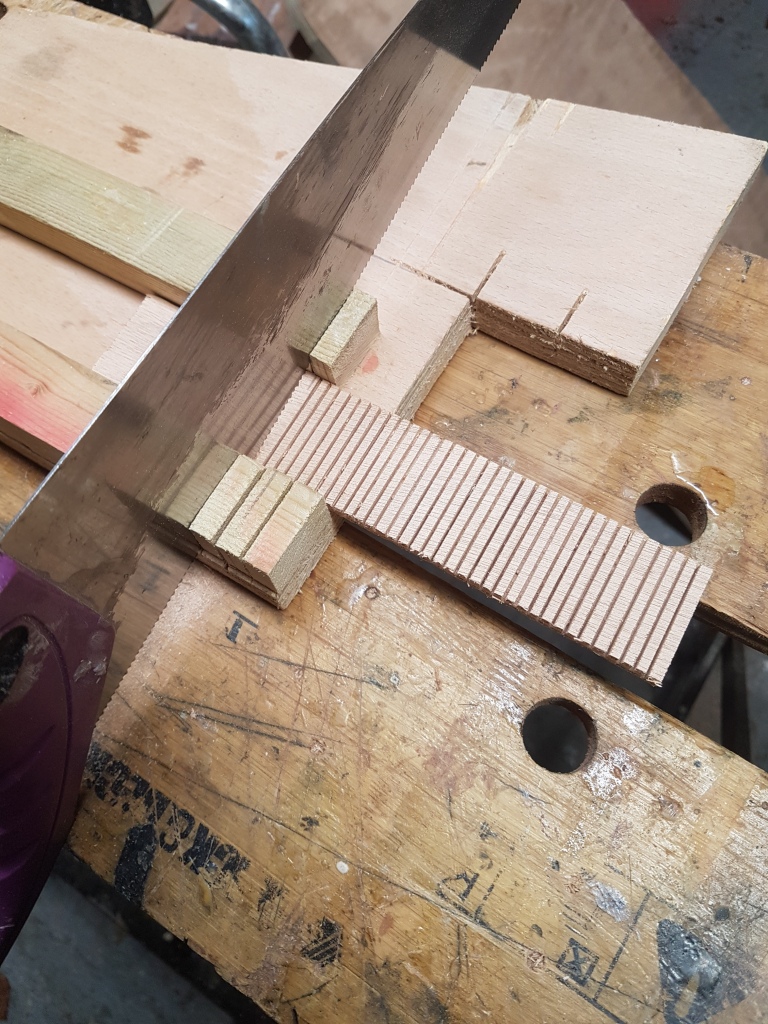
Now for the corners. I had already used “slotted” pieces of ply to make the corners for the lip, so I thought I’d try the same pocess again. I made a jig to cut the slots, cut a trial slot, counting the saw strokes as I went until I thought it was deep enough. 20 strokes were about right. 60 saw cuts later, I had one set of “slotted” wood for one corner. Only another 3600 saw strokes to go.
By the time I had got to the third strip, I was onto a new piece of plywood – it didn’t have the same characteristics as the first and, to make matters worse, was not very uniform. So we had a few cuts that were too deep (bad) and several that were too shallow (not good, but could be rectified). Eventually there were four pieces of slotted wood that could be carefully bent round the corners (against the bottom of the hatch) and held in place by packaging tape whilst the epoxy set. Phew.
Of course, it didn’t fit. It took few hours of “fettling” before the lid fitted, with enough slack to allow for coats of paint (perhaps).
Fitted Hatch Cover
The centre board was antifouled (I had taken this home to do over a wet weekend).
.The rudder gudeon and pintle were fitted to the transom with a stainless steel plate in place behind (well, in front really) of it. Their twins were fitted to the rudder stock and the rudder stock and blade were “trial” assembled and hung on the gudgeons and pintles.
Now what else it there to do/ Lots. Find out in the next exciting instalment.
All over the northern hemisphere the clocks change tonight and we all experience collective jet lag for a day or three until the body clock gets back into synchronicity. Then it’s Halloween and then (in England) Bonfire night and before you know it it will be Christmas (except in Scotland, where it’s been cancelled by the wee lassie with the pursed lips and her team). The local shops (those that are still in business) are aleady garlanded and, I have no doubt, teams of Elves are churning out expensive “Holly and Ivy” , or Reinder and Robin face masks, so that we can all look even more ridiculous – paricularly when we wear that “Christmas” pullover 1 that has ben cowering in the drawer since last Boxing Day. 2
In the meantime there’s been a little progress in the boat shed. She’s now on the trailer. After much thought, suitable lengths of wood were scrounged from the surroundings, lots of bricks were piled on top of each other and levers applied to stout parts of the boat. She was lifted and pushed sideways. The trailer was inched past and she was pushed sideways the other way and lowered onto the bare trailer. Then came the task of sorting out bits of the trailer that were meant to take the load and adjusting them to evenly distibute the weight.
I’d fogotten to put an eye in the bow to secure her. With some trepidation, I drilled a 1 inch hole across the boat, immediately behind the Utilie stem post. Then a hole (longitudinally this time) through the post. The threaded stem of an eye bolt was pushed into the hole and a nut pursuaded to screw onto the stem. The hole was then filld with epoxy and it all looked as goods as new…….Will it stand the strain when hauling her onto the trailer? Time will tell.
Now it was time to get on with other stuff
Like Fairing the deck.
Putting the filler on was easy – it’s the rubbing it all off again that takes the time. Luckily (?) the weather had turned cold and you will notice that the elegant Swallow Yachts woolly hat has made a reappearance (and the scruffy overalls). It was so parky a couple of days that I lit the woodburning stove. Or, at least I tried to light it. It puffed smoke furiously into the shed. ‘The chimney must be cold’ I thought and suffed a burning piece of paper up it. That didn’t work. ‘The damper must be stuck’ I thought. Yes- stuck open.
So it’s not the damper. There’s only one thing for it, take the chimney apart.
Yep! It’s the chimney.
Now we can keep warm. I expect the weather will get warmer too.
Despite the thunder and lightning at the end of August, summer has conducted a fighting retreat and September has been a glorious month. The local harvest has been safely gathered in, basking in warm sunshine. Nonetheless, the evening twilight comes earlier and is increasingly chilly to remind us of what’s coming. The leaves are turning on the trees and rattle (yes, rattle, not rustle) in the stroner breezes.
To the sound of mice running around the insulation in the cow boatshed roof, the boat building has continued. To be honest, it’s getting a bit tedious. All the big stuff has been done, it looks like a boat and she’s itching to get in the water (or I’m itching to get her in the water). I’ve even got a name for her……..
But there’s lots and lots of details to be completed. And, as the Owners Agent will be delighted to tell you, I’m not a completer finisher.1 So this bit of the build is proving difficult for me and I’m always finding things to do that do not include boat building.
The gunnels down the side of the boat (at the join between hull and deck) are to be made of hardwood, about 70 mm wide and 10mm thick. The timber that I had was 3 m long, but each gunnel is over 3.5 m, This meant that scarf joints were required. These are joints where the ends of two pieces of wood to be joined are cut at the same shallow angle and then the resultant faces glued together to make one long piece of straight timber.
I don’t have the skill to make such joints by eye, so made up a jig that would hold each piece of timber at a constant angle to the saw blade. The Mark 2 version worked surprisingly well.
The Mark 1 Scarf joint jig – trying to cut both pieces of wood at the same time.
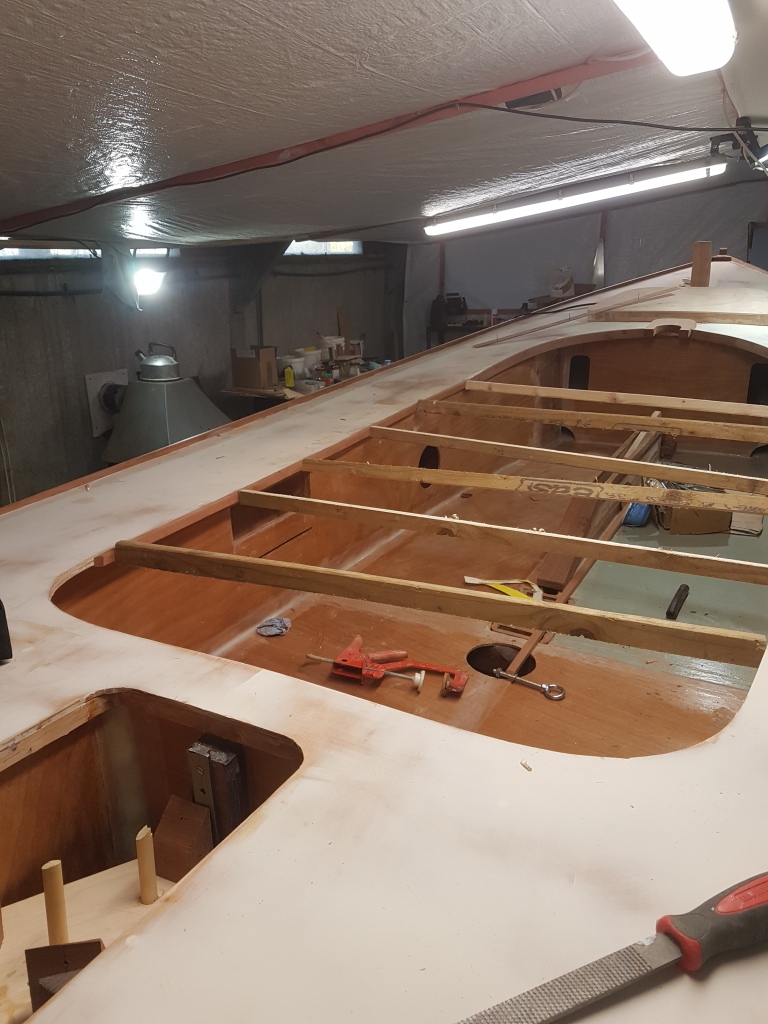
The decks have been glued to the hull, so some compartments have now been sealed permanently (I did vacuum and wipe them clean before gluing the deck on and counted my tools to make sure I hadn’t left any behind). The decks have some awkward camber angles and I was a little at a loss about how to clamp them in place whilst the epoxy set. In the end I used stainless steel wood screws to hold them down. There is a danger with this technique as the effects of temperature changes might make such screws emerge from the deck over time so I crossed my fingers when screwing them in, hoping that I could get them out2. To my surprise (and delight) I was able to extract most of the screws after the epoxy had set. Those that I couldn’t extract usually hid themselves as the screw heads shearied off.
I’m now reinforcing the edge of the deck around the cockpit and forward hatch, fixing some hardwood edging around the centreboard base, making up a grating for the bilge well and upper and lower supports for the mast.
Now the deck is in place, I can tackle the awkward gunnel around the transom but the bend required here is too much for one thickness, so I will have to resort to laminating it. Here’s a selection of pictures:
Adding the lip around the forehatchAnother view of the foredeckThe bilge gratingThe lower mast support block (note – that’s a piece of drain pipe……)The transom gunnel taking shape
There’s still lots to do before I can take her to be painted – getting her on the trailer will be a big challenge for she is now heavier than I can lift on my own…..
Notes
A long time ago, when team building was the management buzz word 3, I had to complete a survey of my management traits. I discovered I was a “plant”4 and wasn’t very pleased about it.
A bit like Boris when he signed the “Leave the EU” treaty although I don’t have to break international law when not boat building.
It probably still is (or would be if you workers were allowed to meet f2f).
It turned out that a plant was (is?) s someone who is full of ideas: I was moderately pleased about that until I read the next bit of the description “some of a “plants” ideas might be useful if given to a completer finisher to execute but most were usually judged to be too ‘off the wall’5 to be any good”.